Alas it has been a while since my last post (again). Well, the good news is we're all fine and well, the bad news is it will probably be a while until my next post.
We're in the process of moving currently and so all internet projects have come to a screeching halt. So no sweet 16th this month. I'll try to make it up to you later.
And now back to the mountains of boxes. I think I've completed construction on the cardboard Alps, now to move on to Everest. (aka the kitchen)
Thursday, December 13, 2012
Friday, November 16, 2012
Sweet 16th: Pumpkin Cinnamon Rolls
Its that time of year when pumpkin enters the kitchen in full force!
This is something I've been wanting to try for a few months and I must say they were worth the wait. While I don't include the recipe here, these would be wicked good with a little cream cheese frosting on the top!

So here we go! I modified this recipe from a cinnamon roll recipe in this cookbook (everything I've tried from this book has been excellent!).
For the rolls you need:
1 1/3 cups lukewarm milk
1 cup pumpkin puree
2 packets of active yeast
1 teaspoon cardamom
1 1/2 sticks unsalted butter, melted
1 egg
8 cups flour
For the filling:
1 1/2 Tablespoon cinnamon
1 teaspoon nutmeg
1 teaspoon ginger
3/4 teaspoon allspice
about 1 cup packed brown sugar
butter
Start with the dough. Put the milk, yeast, cardamom, melted butter and egg in a mixer with a dough hook attachment and mix. Add the pumpkin and mix again.

With the mixer on, add in the flour slowly until it is all incorporated. It will be stiff. (I broke a spatula in it...)
Transfer the dough to a bowl and cover with a clean towel and let rise in a warm place for an hour.
While the dough is proofing, mix together the cinnamon, nutmeg, ginger and allspice for the filling and set aside.

After the hour is up, punch down the dough and transfer to a lightly floured surface. Roll the dough out to about 12 x 30 inches or so. It should be about 1/4 inch thick. This can be tricky as the dough is pretty springy and will want to bounce back in.

Spread butter on the surface of the dough and then sprinkle the spice mixture and the brown sugar over the entire surface.

Roll it up starting from one of the longer sides, then cut at angles roughly 2 1/2 inches apart.


Transfer the buns to parchment lined baking sheets with quite a bit of space between the buns. (They grow a lot more!)
Cover them with a clean towel again and let rise in a warm place for another 30 minutes to an hour. They should be almost doubled in size.
Bake the buns at 400 degrees for 20 to 25 minutes or until golden brown. Transfer to a wire rack and let cool before frosting or just eat them warm!

These are so very toddler approved but I didn't manage to get any pictures of the little man eating one :(
So instead here is a different adorable picture! (or two)


Happy baking!
This is something I've been wanting to try for a few months and I must say they were worth the wait. While I don't include the recipe here, these would be wicked good with a little cream cheese frosting on the top!
So here we go! I modified this recipe from a cinnamon roll recipe in this cookbook (everything I've tried from this book has been excellent!).
For the rolls you need:
1 1/3 cups lukewarm milk
1 cup pumpkin puree
2 packets of active yeast
1 teaspoon cardamom
1 1/2 sticks unsalted butter, melted
1 egg
8 cups flour
For the filling:
1 1/2 Tablespoon cinnamon
1 teaspoon nutmeg
1 teaspoon ginger
3/4 teaspoon allspice
about 1 cup packed brown sugar
butter
Start with the dough. Put the milk, yeast, cardamom, melted butter and egg in a mixer with a dough hook attachment and mix. Add the pumpkin and mix again.
With the mixer on, add in the flour slowly until it is all incorporated. It will be stiff. (I broke a spatula in it...)
Transfer the dough to a bowl and cover with a clean towel and let rise in a warm place for an hour.
 | ||
| pre-rising |
 | ||
| post-rising |
After the hour is up, punch down the dough and transfer to a lightly floured surface. Roll the dough out to about 12 x 30 inches or so. It should be about 1/4 inch thick. This can be tricky as the dough is pretty springy and will want to bounce back in.
Spread butter on the surface of the dough and then sprinkle the spice mixture and the brown sugar over the entire surface.
Roll it up starting from one of the longer sides, then cut at angles roughly 2 1/2 inches apart.
Transfer the buns to parchment lined baking sheets with quite a bit of space between the buns. (They grow a lot more!)
 | ||
| this is before the second rise |
 | ||
| after the second rise |
Bake the buns at 400 degrees for 20 to 25 minutes or until golden brown. Transfer to a wire rack and let cool before frosting or just eat them warm!
These are so very toddler approved but I didn't manage to get any pictures of the little man eating one :(
So instead here is a different adorable picture! (or two)
Happy baking!
Tuesday, November 13, 2012
Butternut Squash Soup!
I love butternut squash, especially as soup.
Want my super delicious recipe?
I thought so :)
You need:
1 butternut squash
veggie oil
1 sweet onion
2 or 3 cloves garlic
4 cups chicken or veggie broth
cinnamon
nutmeg
cloves
ginger
cardamom
cayenne pepper
black pepper
brown sugar
The first step is to peel and chop up the squash. This is the most challenging part and takes a bit of muscle. (Don't forget to scoop out the seeds!)


Next, heat up 1 to 2 Tablespoons oil on medium heat. Chop up the onions and cook for about 3 minutes.

Mince the garlic and measure out about 1/4 teaspoon each of the cinnamon, nutmeg, cloves, ginger, cardamom cayenne and black peppers.

Add the garlic and spices to the onions and stir in. Cook for another minute or so. Add in all of the squash and the broth.

Bring it to a boil, then lower to a simmer and let cook covered for 20 minutes until the squash is nice and soft.

This next part you could do a couple of ways: I use a hand-held mixer in the pot to cream everything up until its really smooth. You could also transfer small batches at a time to a blender to puree everything.
Either way, add in about 5 Tablespoons of brown sugar and blend it in.
Add more of the other spices to taste if you wish. I usually end up adding more cayenne since I love the spicyness!

Dish up and eat up! I like to serve mine with honey wheat toast to dip in the soup.
Wednesday, October 31, 2012
Happy Halloween! Costume pics
As I mentioned previously, little man decided to be a matador this year for Halloween, and now I finally have pictures of the final product!
And here he is (with full matador swagger too :))

I had soooo much fun making this costume, so here are a few glamor shots:


Things started getting silly at this point:

I made a red bag for candy collecting to look like a matador's red cape,

I went through almost a whole bottle of glitter fabric paint on that jacket! And I love the little tassles :)
Hope you all had a fun and safe Halloween!
And here he is (with full matador swagger too :))
I had soooo much fun making this costume, so here are a few glamor shots:
Things started getting silly at this point:
I made a red bag for candy collecting to look like a matador's red cape,
I went through almost a whole bottle of glitter fabric paint on that jacket! And I love the little tassles :)
Hope you all had a fun and safe Halloween!
Saturday, October 27, 2012
Halloween pumpkin carve!
Hey guys, never did make it back to the sweet 16th recipe this month :( but I DID just finish carving my pumpkin for halloween and guess what?! It turned out amazing!!!
Wanna see?

Check out my Ood pumpkin!
This is by far the most complex pumpkin carve I've ever done, but I had a great time. Here's the pumpkin in better light (and my messy carving table):

And extra spooky lighting!:
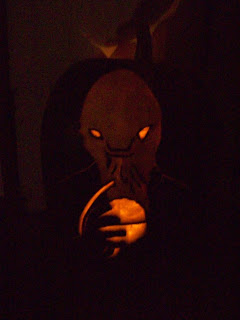
Just in case you are not a Dr. Who watcher, this is what an Ood looks like in the show:
Those spheres on their shirts light up when they talk.
This turned out far cooler than my pac-man pumpkins last year :)
What did you carve on your pumpkins this year?
Wanna see?

Check out my Ood pumpkin!
This is by far the most complex pumpkin carve I've ever done, but I had a great time. Here's the pumpkin in better light (and my messy carving table):

And extra spooky lighting!:

Just in case you are not a Dr. Who watcher, this is what an Ood looks like in the show:
 |
| Image from here |
This turned out far cooler than my pac-man pumpkins last year :)
What did you carve on your pumpkins this year?
Tuesday, October 16, 2012
oops...
Well, I tried to have a sweet 16th post for you today. Unfortunately it didn't turn out so well and I haven't had any re-try time yet.
I attempted to make something along the lines of a gingersnap biscotti but either they burned or were much too soft. Anyways, I shall try to get another attempt and a recipe soon.
In happier new... it finally rained!!! Also, we got some pumpkins :D More to come with those for sure.
I attempted to make something along the lines of a gingersnap biscotti but either they burned or were much too soft. Anyways, I shall try to get another attempt and a recipe soon.
In happier new... it finally rained!!! Also, we got some pumpkins :D More to come with those for sure.
Sunday, October 7, 2012
Fall fun!
The other day we were at the park and we found an abundance of horse chestnuts or conkers. We had a great time hunting for them in the grass and peeling open the spiky pods to find the beautiful nuts inside.

These chestnuts are not good for eating but they sure look beautiful. We collected a whole bag full so now we just need to figure out what to do with them all.
My first project was to make a garland with some of them, so here we go!
First poke some holes through a few of the chestnuts using a strong pin or large needle. I used a hat pin.

The nuts are pretty soft so it only requires a small amount of force to get through the nut. Run the pin back through the hole from the opposite direction.
Then I went through my scrap fabrics and found some lovely fall colors:

Then I cut out lots and lots of different sizes of leaves. I picked fabrics that do not fray easily, but if you do have fraying fabrics you may want to fray check the edges or just embrace the texture of the edges.

Next I cut a ridiculously long bit of thread, threaded a needle (after checking to make sure that it would make it all the way through each of the chestnuts with enough room to pull it through the other side) and knotted the end so that I had a doubled thread the whole length.
I threaded on groups of leaves and secured them in place with a single stitch, leaving a few inches of space in between:

I tied small knots on either side of the chestnuts to help keep them from sliding around too much:

Once one of the knots gets inside the chestnut it will hold fairly well.
I kept on this way for the whole length of the tread and voila! A cute little fall garland :)

I also added a jar full of the nuts to the top of the mantle and this little owl card seemed to fit in so well:

Happy fall friends!
These chestnuts are not good for eating but they sure look beautiful. We collected a whole bag full so now we just need to figure out what to do with them all.
My first project was to make a garland with some of them, so here we go!
First poke some holes through a few of the chestnuts using a strong pin or large needle. I used a hat pin.
The nuts are pretty soft so it only requires a small amount of force to get through the nut. Run the pin back through the hole from the opposite direction.
Then I went through my scrap fabrics and found some lovely fall colors:
Then I cut out lots and lots of different sizes of leaves. I picked fabrics that do not fray easily, but if you do have fraying fabrics you may want to fray check the edges or just embrace the texture of the edges.
Next I cut a ridiculously long bit of thread, threaded a needle (after checking to make sure that it would make it all the way through each of the chestnuts with enough room to pull it through the other side) and knotted the end so that I had a doubled thread the whole length.
I threaded on groups of leaves and secured them in place with a single stitch, leaving a few inches of space in between:
I tied small knots on either side of the chestnuts to help keep them from sliding around too much:
Once one of the knots gets inside the chestnut it will hold fairly well.
I kept on this way for the whole length of the tread and voila! A cute little fall garland :)
I also added a jar full of the nuts to the top of the mantle and this little owl card seemed to fit in so well:
Happy fall friends!
Tuesday, October 2, 2012
Halloween is coming!
And I've already gotten a head start on little man's costume.
This year he is going to be a matador, which he wants to be because of Pixar's El Materdor starring Mater from Cars.
Anyways, I got started on his little matador hat the last couple of days and wanted to share some progress shots!
More pictures of the completed costume coming just as soon as I actually get started on it!
This year he is going to be a matador, which he wants to be because of Pixar's El Materdor starring Mater from Cars.
Anyways, I got started on his little matador hat the last couple of days and wanted to share some progress shots!
 |
| I started with this hat from the thrift store, a whole whoppin $1! |
 |
| I took off the trims and the ribbon band from the inside. |
 |
| Got the whole thing soaking wet with really hot water and stretched it on a larger head form. |
 |
| I sewed up the sides to give it that matador hat shape, trimmed the bottom and edged it with black grosgrain ribbon to avoid the edges fraying. |
 |
| Then I painted it black with acrylic paint watered down a little. |
 | |||
| And voila! Little mini matador hat :) |
More pictures of the completed costume coming just as soon as I actually get started on it!
Sunday, September 16, 2012
Sweet 16! Caramel Apple Muffins
Its that wonderful time of year again: the time when I get to bake with all the flavors of autumn! Currently on my radar are caramel, ginger and apples, so I've whipped up something combining the powers of all three!
These muffins (for its really not fair to call them a cupcake, they don't even have frosting!) are a little bit sweet, delightfully moist and have a wonderful spicy kick to them. These will be a fall favorite for me this year I predict.

The first thing to do is to make some caramel sauce. This is surprisingly easy and makes quite a bit. You can also make this ahead of time as it will keep in the fridge for quite a while. I used this recipe from the Food Network and had no troubles whatsoever.
Combine in a sauce pan:
1 cup packed brown sugar
1/2 cup of half & half (not gonna lie, I used heavy cream, but only because I already had some...)
4 Tbsp. of butter
pinch of salt
Mix the ingredients gently over medium-low heat with a whisk for about 7 minutes or until it begins to thicken.
Add 1 Tbsp. vanilla extract and continue to cook for another minute or so.

Remove from the heat and allow to cool a bit before pouring the caramel sauce into a jar. Set aside in the fridge.
The next step is making applesauce. I decided to make my own but you could easily use store-bought, though I would suggest one without too much added sugar.
For the applesauce you need:
4 granny smith apples
a couple strips of lemon peel
juice from about 1/2 lemon
cinnamon stick
2 Tbsp. brown sugar
2 Tbsp. sugar
1/2 cup water
pinch of salt
Peel the apples, core them and quarter them. To get the strips of lemon peel, simply use a vegetable peeler on the rind of a washed lemon.
Combine all of the ingredients in a medium sauce pan. Cover. Bring to a boil, then lower the heat and allow to simmer for 20 minutes. They should go from this:

to this:
 with a little bit of mashing with a fork.
Now we're almost ready to do the cakes themselves! But first we'll do the crumble topping just so you have it ready when you want it :)
This topping was adapted from this awesome recipe by Bake or Break (I highly recommend these muffins!)
What you need:
1/2 c. flour
1 Tbsp. brown sugar
1 Tbsp. sugar
2 Tbsp. melted butter
1/4 tsp. vanilla
1 Tbsp. chopped crystallized ginger
pinch of salt
Mix it all up in a bowl and set aside.
Now at last we can make the cake batter!
You need:
1/2 cup butter room temp (1 stick)
2 cups flour
1 tsp. baking soda
1 1/4 tsp. cinnamon
1/2 tsp. nutmeg
1/4 tsp. ground cloves
1/4 tsp ginger
1/2 cup sugar
1/2 cup packed brown sugar
2 eggs
1/4 tsp. vanilla
1 cup applesauce
1/4 cup plain or vanilla yogurt
1/4 milk
Wow, having typed that all out now it seems like a lot of things. Anyways, moving on!
Sift together the flour, baking soda and spices.
In the bowl of a mixer, cream the butter and the sugars. Add in the eggs one at a time, mixing well after each. Add the applesauce and vanilla and mix again, making sure to scrape the sides of the bowl. (If you decide to use plain yogurt you may want to add a little bit more vanilla. I used 1/4 tsp. because I used vanilla yogurt.)
At this point you want to add about half of the flour mixture and mix well to combine. Then add the yogurt and the milk and mix again. Finally, add in the remaining flour mixture and combine well.
Distribute the batter into a prepared muffin tin filling the cups about 3/4 full. Make a shallow dip in the tops of the the batter (I used the back side of my melon baller, the poor thing rarely gets used for it's intended purpose.)
Into these dips, pour small spoonfuls of the caramel we made earlier. Then cover the tops liberally with the crumbly topping mixture.
Pop these in the oven for 14 - 16 minutes at 400 degrees, or until a toothpick inserted in comes out clean. (unless you stick it in the caramel, that would be miss-leading)
Allow to cool in the pan or on a wire rack.
This made 15 muffins for me but they are already quickly disappearing.
You could of course drizzle some more of that lovely caramel across the tops of these muffins to sweeten them up a tad more, but I adore them just they way they are!

In fact, I think I'll go have another one :)


Toddler approved!
Happy Baking!
These muffins (for its really not fair to call them a cupcake, they don't even have frosting!) are a little bit sweet, delightfully moist and have a wonderful spicy kick to them. These will be a fall favorite for me this year I predict.

The first thing to do is to make some caramel sauce. This is surprisingly easy and makes quite a bit. You can also make this ahead of time as it will keep in the fridge for quite a while. I used this recipe from the Food Network and had no troubles whatsoever.
Combine in a sauce pan:
1 cup packed brown sugar
1/2 cup of half & half (not gonna lie, I used heavy cream, but only because I already had some...)
4 Tbsp. of butter
pinch of salt
Mix the ingredients gently over medium-low heat with a whisk for about 7 minutes or until it begins to thicken.
Add 1 Tbsp. vanilla extract and continue to cook for another minute or so.

Remove from the heat and allow to cool a bit before pouring the caramel sauce into a jar. Set aside in the fridge.
The next step is making applesauce. I decided to make my own but you could easily use store-bought, though I would suggest one without too much added sugar.
For the applesauce you need:
4 granny smith apples
a couple strips of lemon peel
juice from about 1/2 lemon
cinnamon stick
2 Tbsp. brown sugar
2 Tbsp. sugar
1/2 cup water
pinch of salt
Peel the apples, core them and quarter them. To get the strips of lemon peel, simply use a vegetable peeler on the rind of a washed lemon.
Combine all of the ingredients in a medium sauce pan. Cover. Bring to a boil, then lower the heat and allow to simmer for 20 minutes. They should go from this:

to this:

Now we're almost ready to do the cakes themselves! But first we'll do the crumble topping just so you have it ready when you want it :)
This topping was adapted from this awesome recipe by Bake or Break (I highly recommend these muffins!)
 |
| here's how fine I chopped my ginger |
1/2 c. flour
1 Tbsp. brown sugar
1 Tbsp. sugar
2 Tbsp. melted butter
1/4 tsp. vanilla
1 Tbsp. chopped crystallized ginger
pinch of salt
Mix it all up in a bowl and set aside.
 | |||
| you want a crumbly texture |
Now at last we can make the cake batter!
You need:
1/2 cup butter room temp (1 stick)
2 cups flour
1 tsp. baking soda
1 1/4 tsp. cinnamon
1/2 tsp. nutmeg
1/4 tsp. ground cloves
1/4 tsp ginger
1/2 cup sugar
1/2 cup packed brown sugar
2 eggs
1/4 tsp. vanilla
1 cup applesauce
1/4 cup plain or vanilla yogurt
1/4 milk
Wow, having typed that all out now it seems like a lot of things. Anyways, moving on!
Sift together the flour, baking soda and spices.
In the bowl of a mixer, cream the butter and the sugars. Add in the eggs one at a time, mixing well after each. Add the applesauce and vanilla and mix again, making sure to scrape the sides of the bowl. (If you decide to use plain yogurt you may want to add a little bit more vanilla. I used 1/4 tsp. because I used vanilla yogurt.)
At this point you want to add about half of the flour mixture and mix well to combine. Then add the yogurt and the milk and mix again. Finally, add in the remaining flour mixture and combine well.
Distribute the batter into a prepared muffin tin filling the cups about 3/4 full. Make a shallow dip in the tops of the the batter (I used the back side of my melon baller, the poor thing rarely gets used for it's intended purpose.)
Into these dips, pour small spoonfuls of the caramel we made earlier. Then cover the tops liberally with the crumbly topping mixture.
 | ||
| the cakes on the right side show the caramel pockets, the left has the crumb coating on top. |
Allow to cool in the pan or on a wire rack.
This made 15 muffins for me but they are already quickly disappearing.
You could of course drizzle some more of that lovely caramel across the tops of these muffins to sweeten them up a tad more, but I adore them just they way they are!

In fact, I think I'll go have another one :)


Toddler approved!
Happy Baking!
Subscribe to:
Posts (Atom)