Sunday, February 26, 2012

Oscars

So I don't often do full fashion posts here (despite having majored in apparel design) but I just finished watching this year's Academy Awards and I must say the stars did not disappoint.  I will refrain from commenting on the awards as I did not (as usual) see all of the films.  I'm happy for the winners and loved the films that I did see which were nominated.

Moving on,   my favorite dress tonight was Jessica Chastain's.  It was jaw-droppingly gorgeous, doesn't follow spring trends, and totally did not fit her. (Her chest was trying to escape and her arms were pinched.)  Despite these issues, the dress was fantastic!

found here


I also really loved Rooney Mara's overall look, but especially her hair and makeup:

found here

and here
Not entirely enamoured with the little wings off the chest, but otherwise a beautiful gown and fantastically simplistic styling.

Alrighty, done for now.  Good night!

Friday, February 24, 2012

New colors

Yesterday was a rough day at the workplace.  Came home extra tired, and in need of some cheering up...nothing a little hair dye and new nail polish color couldn't help!


I must say I'm a big fan of the pink "tart deco" by essie.  The green "minted" is Revlon, but I was a bit disappointed, it was really thin and runny.   Guess its worth the 3 extra bucks for the essie polish.  It even made it through a whole day at work!

Sunday, February 19, 2012

Geek Chic

So a while back I came across this fantastic button just by chance.  It looks like a death star.  Except it was brown.  Easy fix though, a little paint and some patience... voila, death star button!  Anyways, I knew I wanted to make a bracelet with the death star button as the closure.  I toyed with the idea of embroidering little x-wings and TIE fighters onto a leather cuff for a while. Then, just the other day I finally decided to finish the project and make it a wrapped bead bracelet. 

I made my first wrap bracelet last summer from this fantastic tutorial video.   It turned out adorable and I've been waiting for an excuse to make another one.   Here's my first one:


For my death star bracelet I started off with several varieties of beads.  I decided to make it a double wrap so I needed a lot of beads to work with.

These are all jet glass or faceted glass, and thanks to a 50% off sale, all for under $10!

I took the largest flat ones and painted a few of them:

A few x-wings, a couple TIE fighters, and some lasers of course!

I used Irish linen thread that I purchased for my first wrap bracelet again for this one.  I love the way it feels and the knots hold extremely well.   I laid out my beads in the pattern I wanted (a little more complicated as many of them were doubled to get the right height to match the larger beads.


After many frustrated first attempts at getting the thread going without knotting:


and switching to a different thread after 3 failures with the first kind...I finally got the bracelet finished!


So here it is!  It just looks like a fun sparkly bracelet until you look close:


Thursday, February 16, 2012

Finally got some hat time

I finally got some time this past week to get some hats finished and photo shoots done.  Thanks to my lovely friends who model them for me!


Blue sequin pillbox, Grey tux hat, Red pillbox with chiffon flowers

It was freezing out when those last two were taken, modeling is hard.

Tuesday, February 14, 2012

Sweet 16th! Lemon Cupcakes with Ombre Sugar

and Happy Valentine's day,  which is of course why sweet 16 is early this month.

I struggled with what I wanted to make this month and then the lovely folks over at Cake Wrecks posted a fantastic valentine sweet with a tutorial for making ombre sugar hearts.   Now, I'm always up for a good sugar challenge and so I went ahead and tried it.  I didn't make hearts because I don't have a small enough heart shaped cookie cutter.  Anyways,  Here's what I created this week:

This is a lemon cupcake (tinted pink for valentine's day) with lemon cream cheese frosting and ombre sugar decorations.   And by the way, this is probably one of the best cake batters I have ever had.

So here we go,  I found the recipe for the cake at My Baking Addiction, their instructions are great so I'll post my pics and some things I tried, but follow the link for easy to follow directions.

I made the ombre sugar first because they have to harden overnight.  Here's the very easy recipe from The Wedding Chicks.

You need:
sugar (lots)
1 egg white (more depending on how much you make)
paste food coloring of you color choice
parchment paper, cooking sheet, bowls, measuring spoons, rolling pin

Start with 1/2 cup of sugar in a bowl.  Add food coloring and mix until evenly colored,  this takes a while.  I used a rubber spatula to press it in.  You want to mix this to be your darkest color, also, it will get a little darker when you add in the liquid.  After the color is all mixed in, add 1 tsp. egg white and mix in thoroughly.  It should look like wet sand.  Don't mix too much liquid in or it may dissolve the sugar.


Dump the mixture out onto a parchment covered cutting board and press flat.  You want it to be as compact as possible.  Roll over it with a rolling pin to flatten it. 


Then use a cookie cutter of your choice to cut out shapes.  Transfer them to a parchment lined baking sheet.


Return the rest of the sugar mix to the bowl.  Add another 1/2 cup of sugar and mix.  Add another tsp. of egg white and mix in well.

This should give you a shade lighter than the first batch.  If it is not light enough add in another 1/2 cup sugar and tsp. egg white until desired shade is reached.  Then repeat the flattening, rolling and cookie cutting process until you have all of the sugar shapes you want.


Bake them at 200 degrees for about 10 minutes.  Then let them cool and harden overnight.  They should be the consistency of sugar cubes.

After I made these I realized that I needed something to put them on.  Not that I couldn't just eat colored sugar rounds, but I figured it would be more fun if some kind of cake or something was involved.

For the cupcakes you need:
2 1/4 cups cake flour
1 tablespoon baking powder
1/2 teaspoon salt
1 1/4 cups buttermilk
4 large egg whites
1 1/2 cups sugar
lemon zest from two lemons
1 stick (8 tablespoons) unsalted butter, at room temperature
1 teaspoon pure vanilla extract
1/2 teaspoon pure lemon extract

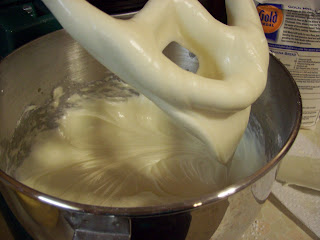
First sift together the flour, baking powder and salt.  In another bowl whisk together the buttermilk and egg whites.  Finally, in a large mixer bowl mix the sugar and the lemon zest with your hands.  This is the most amazing thing ever, the smell, the texture, totally one of the best baking experiences ever!

 Add the butter into the sugar and lemon zest and combine with a mixer.  Beat for 3 minutes until fluffy.  Beat in the extracts and 1/3 of the flour mixture.  Add half of the milk mixture and blend in well.  Then add in half of the remaining flour mix and blend.  Mix in the last of the milk mix until the dough is well mixed, then add in the last of the flour mix.  Beat for a full two minutes to make sure the batter is well combined and aerated.

At this point I added in 2 drops of pink food coloring to tint my batter pink for the holiday.


Pour the batter into lined muffin tins:

and bake for 18-20 minutes at 350 degrees until a toothpick in the center comes out clean. 

Set to cool on wire racks.


The frosting now!

you need:
2 8oz. packs of softened cream cheese
1 stick butter softened
2 lbs. confectioners sugar (yes really, a whole bag)
2 tsp. vanilla
juice from one lemon

Blend the cream cheese and butter in a mixer. Gradually add in the sugar until it is all incorporated.  Lastly add in the lemon juice and vanilla and blend well.

This makes a lot of frosting.   You probably only need a half recipe for this many cupcakes, but who doesn't want a little extra frosting in the fridge : )


Frost the cakes with a knife or with a pastry bag, up to you!


Decorate however you like.  Here were my first failed attempts:


Didn't like the way these ones looked so I decided to just do one or two sugar rounds.


Naturally these are toddler approved (is any cupcake not?)


Frosting face!


Happy baking and Happy Valentine's Day!

Saturday, February 11, 2012

Hat project follow up

Yesterday I shared most of my favorite photos from my hat rummagings thus far.  As promised, here are the some of the absolute treasures in the collection.

Lets start off with a funny one,  it is Saturday after all, might as well enjoy ourselves. 


This is pretty clearly not an original vintage hat in its entirety.   It has been modified to suit some eccentric character of the stage, and isn't it just glorious because of that?!  I have seen some horridly modified hats and some expertly done ones but none made me giggle quite as much as this one did.


For reals now,  as Jack Sparrow said "Not all treasure is silver and gold mate."   If hats can be called a treasure (and I certainly think they can)  then I am no doubt obsessed. 


This hat is completely crushed and tragically I seriously doubt if it can be restored.  The fabric and interior support are so fragile that I think they will just crumble if any attempt is made to return them to a hat shape.  But the detail is amazing and the original hatpin covered to match!  The actual pin excluding the handle, is about 5 inches long.


 This bonnet just screams Jane Austen.  Apart from discolorations on the lining and some of the flowers, this hat is in quite good shape.  I believe the ribbon ties are even original. 
This is the inside lining.  I love the little "FRONT" arrow.  I have attempted to do a little research on Parmillo Hats to no avail (yet).  But I will keep looking.  Hopefully the university library will help me turn up something. 


And now, last but most certainly not least, here is the hat that first made me realize that I might find more than I was expecting amongst the hats in the costume attic. 


A hat fit to be worn by lady Mary Crawly of Downton.

The hat pins are not original.  The first picture has the closest to true color.  The under brim is lined with velvet and the swath of fabric around the crown is silk. 

I completely adore this hat. 

Hopefully I will be able to get some more pictures, and I shall share them as they come.