As stated in the title, I will not be posting a sweet tomorrow for the 16th. Because, well, I'm writing personal statements for grad applications. I have to say, personal statements are the hardest thing to write. Someone accept me at a university and give me a research paper! Please?!
Anyways, later in the month I'm planning on making bacon caramel corn, so there's that to look forward to.
Back to my challenging task. Wish me luck!
Friday, November 15, 2013
Monday, November 11, 2013
SteamCon V Costume Photos
At long last, I have some beautiful photos of the full costumes! All these photos are courtesy of Terry Fogerson. (Thanks again!!)
Since I've already talked about the process of most of the pieces I'll just get right to the pictures. Cause they're pretty.


Anywho, it was a fun though freezing (for me) morning of photos, and the weather kindly cooperated.
Here are a few links to previous parts of the project:
planning stages
skirts
mechanical bird
tea dying
faux fur and leather
Since I've already talked about the process of most of the pieces I'll just get right to the pictures. Cause they're pretty.
 |
| I'm pretty sure I was just fixing something or pulling a dog hair off the coat. I can't stop! |
 |
| This really shows the beautiful space we had to photograph in, but blimey it was cold! |


Anywho, it was a fun though freezing (for me) morning of photos, and the weather kindly cooperated.
Here are a few links to previous parts of the project:
planning stages
skirts
mechanical bird
tea dying
faux fur and leather
Wednesday, October 30, 2013
Halloween 2013
I last left you with a teaser picture of the little man's costume for this year, but with Steamcon over and Halloween tomorrow, the wait is over!
Behold, the very silly minion!


I think he likes it!
Also, bonus! We (and when I say we I really me I) carved pumpkins the other night. I was considering continuing my Dr. Who theme from last year by carving a weeping angel, but I decided I really didn't want to stare at a picture of a terrifying angel all night. Instead, I did a little sketch from the classic Disney Alice in Wonderland:

And then drew that onto my pumpkin. And then the loooong carving process began. I think it was close to three hours this year, but that includes helping the little one with his pumpkin. Here's a picture of him feeling very unsure about sticking his hand in pumpkin guts:

And here's his finished pumpkin at the end of the night. It was his design in the end, I just had to scrape out the insides for him and help with the carving.

Anyways, getting back to the cat. Here are some in-process shots:


And the finished product!
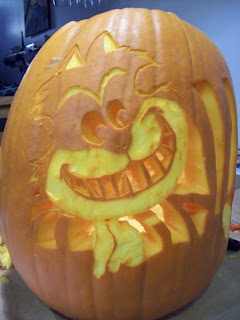

And finally, both lit up:


Anywho, that's all for now. Have a happy, fun, safe Halloween!
Tuesday, October 8, 2013
Cutting faux fur and leather
I recall mentioning that I would post some thoughts on the cutting of fake fur so here it is, followed by some leather cut out ideas!
Cutting faux fur can be extremely messy but there is an easy way to minimize the mess potential.
Make your measurement marks or pattern marks on the back side of the fur using a chalk pencil or a watercolor pencil (my preference for more exact lines):


Use an x-acto knife or a box cutter to cut the woven fabric back side of the fur:


Once the strip is fully separated it will have loose bits of fur and fibers along the cut edge. Use your fingers to pull these bits away from your piece and the remaining fabric:


After this you should have a piece with clean edges:

And a pile of fuzz:
 Which can now be disposed of easily!
What you never ever want to do is cut faux fur with scissors as you will end up cutting the hairs along your cut edges. This will not only make a huge mess but also make the edges have uneven lengths of hairs.
Let's move on to leather now!
I wanted to have some cut out details on my hubby's coat for steamcon and was undecided on what material I wanted to use. I was considering thin metal but eventually decided on leather for the ease of movement not to mention I'm a tad more comfortable working with it. (It also saves me from buying more tools, which while I wouldn't say no to more tools, I don't really have a great space for them. Tryin' to keep it minimal here! Ha)
I ended up buying a whole side of beautiful dark brown/black oiled leather as I plan on making pauldrons and greaves as well as the decorative pieces on the coat, but I haven't gotten there yet so let's start with the decorations.
First I drew and cut out paper templates for the pieces:

Next I cut pieces of leather just barely larger than the stencil pieces and then traced the stencils onto the leather with pencil:


I then used a very sharp x-acto knife to cut out the small interior pieces. I used small snips to clean up loose bits along the cut edges.

Once all the interior pieces were cut out I used sharp scissors to cut along the outside edge of the design. When you are cutting leather it is important to use sharp tools and to try not to pull. Leather stretches and if you pull it while cutting it will make your pieces distorted in shape and possibly color as well.
I then used E6000 adhesive to glue the leather to a contrasting backing fabric:

Then I pinned and sewed the fabric pieces onto the coat. I also tacked through the leather in a couple of places for extra stability:


I also beaded around the outer-edge along the transition between the fabrics.
Here's the front now:

And the back:

So there you have it. At least I'm making progress here as I only have a couple weeks left. As a time reference if you are planning on trying something like this, the cutting out of the leather alone took me the entire length of the BBC version of Pride and Prejudice. (The long one with Colin Firth.)
And now this post is really long and full of pictures so I will end it here! Back soon with more.
Cutting faux fur can be extremely messy but there is an easy way to minimize the mess potential.
Make your measurement marks or pattern marks on the back side of the fur using a chalk pencil or a watercolor pencil (my preference for more exact lines):


Use an x-acto knife or a box cutter to cut the woven fabric back side of the fur:


Once the strip is fully separated it will have loose bits of fur and fibers along the cut edge. Use your fingers to pull these bits away from your piece and the remaining fabric:


After this you should have a piece with clean edges:


What you never ever want to do is cut faux fur with scissors as you will end up cutting the hairs along your cut edges. This will not only make a huge mess but also make the edges have uneven lengths of hairs.
Let's move on to leather now!
I wanted to have some cut out details on my hubby's coat for steamcon and was undecided on what material I wanted to use. I was considering thin metal but eventually decided on leather for the ease of movement not to mention I'm a tad more comfortable working with it. (It also saves me from buying more tools, which while I wouldn't say no to more tools, I don't really have a great space for them. Tryin' to keep it minimal here! Ha)
I ended up buying a whole side of beautiful dark brown/black oiled leather as I plan on making pauldrons and greaves as well as the decorative pieces on the coat, but I haven't gotten there yet so let's start with the decorations.
First I drew and cut out paper templates for the pieces:

Next I cut pieces of leather just barely larger than the stencil pieces and then traced the stencils onto the leather with pencil:


I then used a very sharp x-acto knife to cut out the small interior pieces. I used small snips to clean up loose bits along the cut edges.

Once all the interior pieces were cut out I used sharp scissors to cut along the outside edge of the design. When you are cutting leather it is important to use sharp tools and to try not to pull. Leather stretches and if you pull it while cutting it will make your pieces distorted in shape and possibly color as well.
I then used E6000 adhesive to glue the leather to a contrasting backing fabric:

Then I pinned and sewed the fabric pieces onto the coat. I also tacked through the leather in a couple of places for extra stability:


I also beaded around the outer-edge along the transition between the fabrics.
Here's the front now:

And the back:

So there you have it. At least I'm making progress here as I only have a couple weeks left. As a time reference if you are planning on trying something like this, the cutting out of the leather alone took me the entire length of the BBC version of Pride and Prejudice. (The long one with Colin Firth.)
And now this post is really long and full of pictures so I will end it here! Back soon with more.
Thursday, September 26, 2013
And then I dyed
Hello! As I mentioned in my last post I have been excessively busy, but I thought I'd share a few pics of the costumes I've been working on. First up, some things for Steamcon, which is right around the corner!
Of course, with the deadline for the play I'm working on fast approaching, I've taken a brief break from the Victorian era and switched to the late 50s. I ended up needing to do some dying of polyester so that was a fun experiment. Dying poly is kind of like making fudge, only way less awesome. You have to stand at the stove and stir it constantly for about 45 minutes but in the end you don't get to eat it. And you have to wear (or I think you should wear) a face mask so you don't breath it in. No delicious chocolaty smells from the dye bath.
On the positive, my dying experiment totally worked!
I needed to seriously tone down this fabric so the dress wouldn't stick out from the other costumes like a sore thumb. I'm calling that a success!
In other dying news, I much prefer tea dying.
Anywho, The Brick and The Rose (the show I'm doing costumes for) opens next week so after that it is back to the meticulous hand details of the Victorian clothes. And then full costume shots! And Halloween!
Speaking of Halloween, what should I carve on my pumpkin this year? Here's what I did last year.
 |
| A little sneak preview of my vest. So much more beading to do... |
 |
| In progress shot of my hubby's jacket. Faux fur cutting tutorial to come later. |
Of course, with the deadline for the play I'm working on fast approaching, I've taken a brief break from the Victorian era and switched to the late 50s. I ended up needing to do some dying of polyester so that was a fun experiment. Dying poly is kind of like making fudge, only way less awesome. You have to stand at the stove and stir it constantly for about 45 minutes but in the end you don't get to eat it. And you have to wear (or I think you should wear) a face mask so you don't breath it in. No delicious chocolaty smells from the dye bath.
On the positive, my dying experiment totally worked!
 |
| Before: purple, After: blue |
In other dying news, I much prefer tea dying.
 |
| Before, plain old white. |
 |
| This dye bath does smell good! Even if it is just the cheep stuff. |
 |
| Let it soak. |
 |
| Muuuuch better! |
Speaking of Halloween, what should I carve on my pumpkin this year? Here's what I did last year.
Tuesday, September 17, 2013
Insert something, too scatter brained to come up with a title
So, the 16th came and went and well, I just don't have anything. Sorry. I've been so busy working on my ridiculous pile of projects. I think I may just have to put a pause on regular posting for a bit while I finish up some big things.
Some of you may know, I am currently working on applications and my portfolio for graduate school, on top of costuming a play and costumes for Steamcon. Oh, and a Halloween costume for the little man.
Anyways, you get the point. In the meantime, try these Raspberry Bars!
I left out the nuts and almost doubled the amount of fresh raspberries.
Thursday, September 5, 2013
Friday, August 23, 2013
Project revisited: Mechanical Bird
A week ago I posted a picture of supplies for a project I was just starting and I have the little guy ready to show now!
This is Tak, my singing mechanical bird. He is for SteamCon but he will probably sit on my mantle until then. Anyways, I have some in process pictures and a few more finished product shots.

So there he is! He plays a little song that I haven't quite been able to place. It is familiar but not instantly recognizable (for me at least, which is why I picked that particular snow globe at the thrift store to tear apart).
Big shout out to these awesome artists whose work inspired little Tak here.
HazelFisherCreations
C.O.G. Chronicles
Mullanium by Jim & Tori
 |
| Hi there! |
This is Tak, my singing mechanical bird. He is for SteamCon but he will probably sit on my mantle until then. Anyways, I have some in process pictures and a few more finished product shots.
 |
| I sculpted flattened clay pieces around a foil egg shape. |
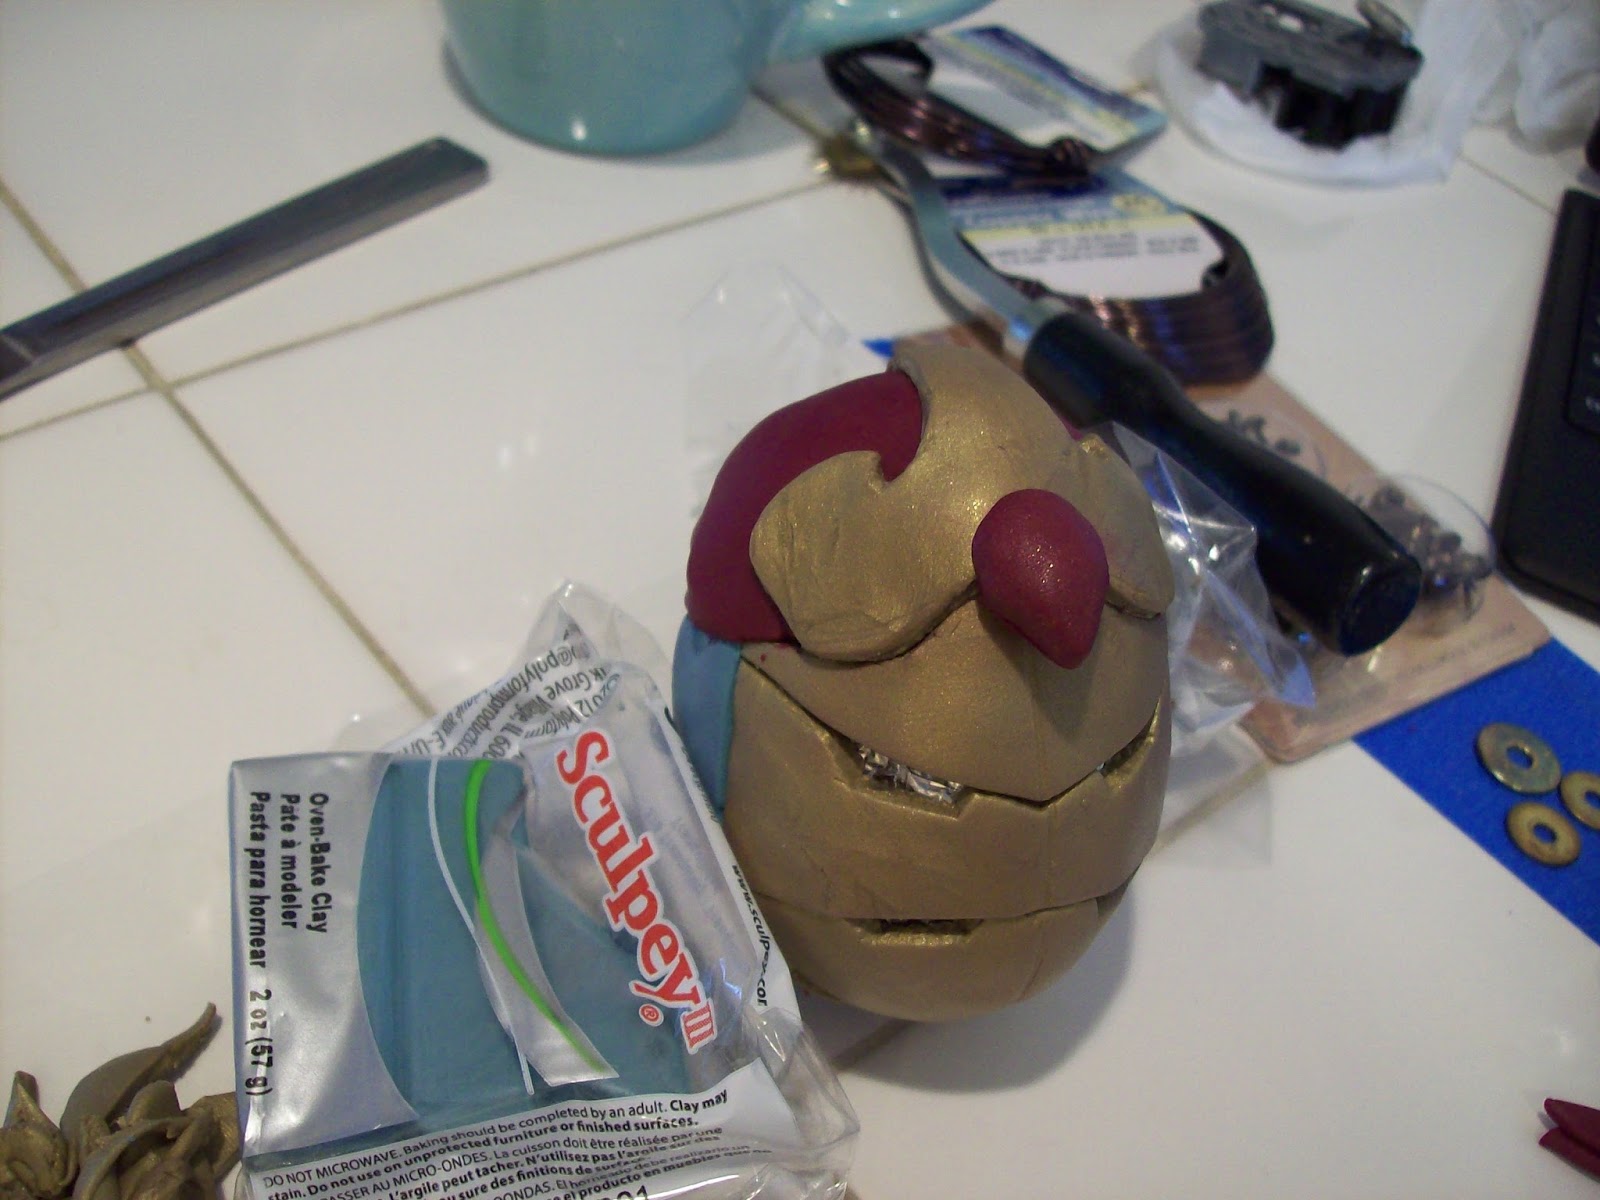 |
| Had to make sure that the pieces fit together but could be separated after baking. |
 |
| I changed the turning handle on my music box mechanism to one from an old clock. |
 | ||
| After baking the clay, I used small screws to make the holes for the legs a little larger. |
 |
| Starting to glue the pieces together and attaching the legs. |
 |
| Putting in the music box. |
 |
| Mechanical bird guts. |
 |
| Some beauty shots. |
 |
| I added a piece of gold painted buckram to look like metallic mesh at his throat to allow for some extra room for the music box as well as giving his head a curious tilt, like birds do. |

So there he is! He plays a little song that I haven't quite been able to place. It is familiar but not instantly recognizable (for me at least, which is why I picked that particular snow globe at the thrift store to tear apart).
Big shout out to these awesome artists whose work inspired little Tak here.
HazelFisherCreations
C.O.G. Chronicles
Mullanium by Jim & Tori
Subscribe to:
Posts (Atom)